
Finetuning LayoutLMv1 Without a Single Real Document: A Production-Grade Synthetic Data Pipeline
Christian Okeme
13 min read-25 May, 2026Senior Software Engineer, specializing in distributed systems, fintech, and applied machine learning
The Problem Nobody Warns You About
You've discovered LayoutLM, Microsoft's multimodal transformer that jointly understands text, layout, and — in later versions — visual features. It achieves state-of-the-art scores on FUNSD, CORD, and SROIE.
The Hugging Face hub makes loading it trivially easy. You're excited.
Then reality hits: you need annotated documents to finetune it.
Not just images. Not just text. You need token-level bounding boxes, NER labels in BIO format, and enough volume to actually shift the model weights.
If you're working with identity documents — driver's licenses, voter cards, passports — you immediately run into:
- Privacy regulations: You cannot legally scrape or store real ID documents.
- Data scarcity: Even if you could, each document variation (template, state, year) needs hundreds of samples.
- Annotation cost: Manual labeling of OCR outputs at token level costs thousands of dollars per document type.
This article walks through the solution we built at Urtentic: a fully synthetic data generation pipeline that produces annotated documents at scale, designed specifically to finetune LayoutLMv1 for field extraction from identity documents.
No real documents were used. The trained model runs in production.
The full pipeline is open source: github.com/urtentic/layoutlm-synthetic-data
What LayoutLMv1 Needs to Learn
Before building the data pipeline, you need a clear mental model of what the architecture is actually learning.
LayoutLMv1 (Xu et al., 2020) extends BERT by adding two spatial embedding dimensions: a 2D position embedding for the X axis and one for the Y axis. During pretraining on IIT-CDIP (11 million document images), the model learns to associate token semantics with spatial location. Finetuning teaches it to recognize that "the token at the top-right of a driver's license is probably a license number" — even without visual features.
For token classification (field extraction), your finetuning dataset must contain:
{
    "id": "sample_0001",
    "tokens": ["FEDERAL", "REPUBLIC", "OF", "NIGERIA", "A12345678"],
    "bboxes": [
        [120, 45, 280, 80],   # x1, y1, x2, y2, normalized to 0-1000
        [290, 45, 430, 80],
        [440, 45, 480, 80],
        [490, 45, 620, 80],
        [800, 120, 960, 155],
    ],
    "ner_tags": ["O", "O", "O", "O", "B-LIC_NO"]
}
Three things to internalize:
- Bounding boxes are normalized to 0–1000, not pixel coordinates. This makes training document-size-agnostic.
- BIO tagging (Beginning, Inside, Outside) lets multi-token fields be labeled correctly. "JOHN MICHAEL DOE" across three tokens becomes B-NAME, I-NAME, I-NAME.
- Every token on the page must appear, including static header text (labeled O). The model needs full spatial context, not just the extractable fields.
Architecture of the Pipeline
generate_layoutlm.py is a self-contained pipeline — it does not depend on rendered images or pre-existing annotations from any other script. It reads a document config file and a blank template image (only to get pixel dimensions), then produces LayoutLMv1-ready JSON from scratch:
┌──────────────────────────────────────────────────────────────────┐
│  generate_layoutlm.py — Standalone JSON Annotation Pipeline      │
│                                                                  │
│  1. Load document_types.json config                              │
│  2. Load template image (dimensions only — no rendering)         │
│  3. Generate synthetic field values (DataGenerator + Faker)      │
│  4. Calculate per-token bounding boxes (BoundingBoxCalculator)   │
│     • Estimated character metrics + random font variation        │
│     • Per-token bbox padding noise (OCR box imprecision)         │
│     • Field-level position jitter                                │
│  5. Apply OCR text errors (OCRErrorSimulator)                    │
│     • Character confusions (O↔0, I↔1, S↔5, …)                    │
│     • Token mutations: swap, delete, duplicate, confuse          │
│     • Spacing errors: merge adjacent words, split long words     │
│     • Word-level replacements (STREET→ST, AVENUE→AVE, …)         │
│  6. Process static anchors                                       │
│     • EU field-number prefixes (1., 4a., …) → typed KEY labels   │
│     • All other pre-printed text → O                             │
│  7. Sort by reading order (y-bin + x) → BIO repair pass          │
│  8. Output: JSON only (tokens, bboxes, ner_tags)                 │
└──────────────────────────────────────────────────────────────────┘
No images are written. The pipeline produces training-ready JSON that already reflects the imperfect text and slightly-off bounding boxes a real OCR engine would return — so the finetuned model learns from OCR-realistic data, not pixel-perfect ground truth.
Step 1: Template-Based Document Configuration
We represent each document type as a JSON configuration that maps visual field regions to data generators. Here is a simplified excerpt for a Nigerian driver's license:
{
  "document_types": {
    "drivers_license": {
      "labels": ["LIC_NO", "NAME", "DOB", "SEX", "ADDRESS", "ISS_DATE", "EXP_DATE"],
      "templates": [
        {
          "template_path": "assets/ng-license-template-1.png",
          "field_mappings": {
            "txt_lic_no": {
              "pos": [800, 215],
              "scale": 1.2,
              "label": "LIC_NO",
              "generator": "license_number",
              "color": "black"
            },
            "txt_name": {
              "pos": [793, 610],
              "scale": 1.3,
              "label": "NAME",
              "generator": "full_name",
              "color": "black"
            },
            "txt_dob": {
              "pos": [793, 675],
              "scale": 1.2,
              "label": "DOB",
              "generator": "date_of_birth",
              "color": "black"
            }
          },
          "static_anchors": [
            {"text": "FEDERAL REPUBLIC OF NIGERIA", "bbox": [290, 45, 720, 80]},
            {"text": "DRIVER'S LICENCE", "bbox": [330, 95, 670, 135]}
          ]
        }
      ]
    }
  }
}
Why template-based? Because document templates are legally available (governments publish them) and your model needs to learn position-aware field associations. A generative image model would require far more compute and produce less controllable output.
The static_anchors array is critical — it provides the pre-printed header text that never changes. These tokens are labeled O but they anchor the spatial context for the model.
Step 2: Realistic Data Generation
The DataGenerator class wraps the Python Faker library with domain-specific logic. Here is what "realistic" actually requires:
Cross-Field Dependencies
Naively generating dates independently will produce documents where an expiry date precedes the issue date. Use a context dictionary to thread state:
class DataGenerator:
    def __init__(self):
        self.fake = Faker(['en_NG', 'en_GB'])
        self.context = {}

    def generate_issue_date(self):
        days_ago = random.randint(0, 4 * 365)
        issue_date = datetime.now() - timedelta(days=days_ago)
        self.context['issue_date'] = issue_date  # save for expiry
        fmt = random.choice(['%d-%m-%Y', '%d/%m/%Y', '%d.%m.%Y'])
        return issue_date.strftime(fmt)

    def generate_expiry_date(self):
        issue_date = self.context.get('issue_date', datetime.now())
        years_valid = random.randint(3, 10)
        expiry_date = issue_date + timedelta(days=365 * years_valid)
        fmt = random.choice(['%d-%m-%Y', '%d/%m/%Y', '%d.%m.%Y'])
        return expiry_date.strftime(fmt)
Format Diversity
Real documents use inconsistent formats — your model must handle them all. Generate this diversity deliberately:
def generate_full_name(self):
    # 70% chance: LAST , FIRST MIDDLE
    # 30% chance: FIRST LAST
    if random.random() < 0.70:
        last = self.fake.last_name().upper()
        first = self.fake.first_name().upper()
        # 30% chance of middle initial instead of full middle name
        middle = (random.choice('ABCDEFGHIJKLMNOPQRSTUVWXYZ') + '.'
                  if random.random() < 0.30
                  else self.fake.first_name().upper())
        # 15% chance to add generational suffix
        suffix = random.choice(['JR', 'SR', 'II', 'III', ''])
        name = f"{last} , {first} {middle}"
        if suffix:
            name += f" {suffix}"
        return name
    else:
        return f"{self.fake.first_name().upper()} {self.fake.last_name().upper()}"
This variety forces the model to learn that a name field can take multiple surface forms — the spatial position and surrounding anchors are what identify it as a NAME, not its exact format.
Step 3: Bounding Box Calculation
Every rendered token needs a normalized bounding box. The key insight is to calculate character-level metrics using PIL's font metrics, then sum across tokens:
from PIL import ImageFont, ImageDraw
import numpy as np

def calculate_token_bboxes(text, position, font, image_width, image_height):
    """
    Returns list of (token, [x1, y1, x2, y2]) with coords normalized 0-1000.
    position: (x, y) pixel coordinates of text start
    """
    x_cursor, y = position
    tokens = text.split()
    results = []

    for token in tokens:
        # PIL font metrics for exact dimensions
        bbox = font.getbbox(token)  # (left, top, right, bottom)
        token_width = bbox[2] - bbox[0]
        token_height = bbox[3] - bbox[1]

        x1 = x_cursor
        y1 = y + bbox[1]
        x2 = x_cursor + token_width
        y2 = y + bbox[3]

        # Normalize to 0-1000
        norm_bbox = [
            int(1000 * x1 / image_width),
            int(1000 * y1 / image_height),
            int(1000 * x2 / image_width),
            int(1000 * y2 / image_height),
        ]
        results.append((token, norm_bbox))

        # Advance cursor (add space width)
        space_width = font.getlength(' ')
        x_cursor += token_width + space_width

    return results
Updating Bounding Boxes After Augmentation
When you rotate or translate an image, the bounding boxes must move with it. For rotation, transform each corner through the rotation matrix and recalculate the axis-aligned bounding box:
def rotate_bbox(bbox, angle_deg, image_center, image_width, image_height):
    angle_rad = np.radians(angle_deg)
    cx, cy = image_center
    x1, y1, x2, y2 = bbox

    corners = np.array([
        [x1, y1], [x2, y1],
        [x2, y2], [x1, y2]
    ], dtype=float)

    # Rotate around image center
    cos_a, sin_a = np.cos(angle_rad), np.sin(angle_rad)
    corners -= [cx, cy]
    rotated = corners @ np.array([[cos_a, -sin_a], [sin_a, cos_a]])
    rotated += [cx, cy]

    new_x1 = max(0, int(rotated[:, 0].min()))
    new_y1 = max(0, int(rotated[:, 1].min()))
    new_x2 = min(image_width, int(rotated[:, 0].max()))
    new_y2 = min(image_height, int(rotated[:, 1].max()))

    # Re-normalize
    return [
        int(1000 * new_x1 / image_width),
        int(1000 * new_y1 / image_height),
        int(1000 * new_x2 / image_width),
        int(1000 * new_y2 / image_height),
    ]
Step 4: Realistic Augmentations
The augmentation strategy is deliberately restrained. We are not doing data augmentation for a classification model that needs to learn rotation invariance. We are simulating real-world document capture conditions. That means:
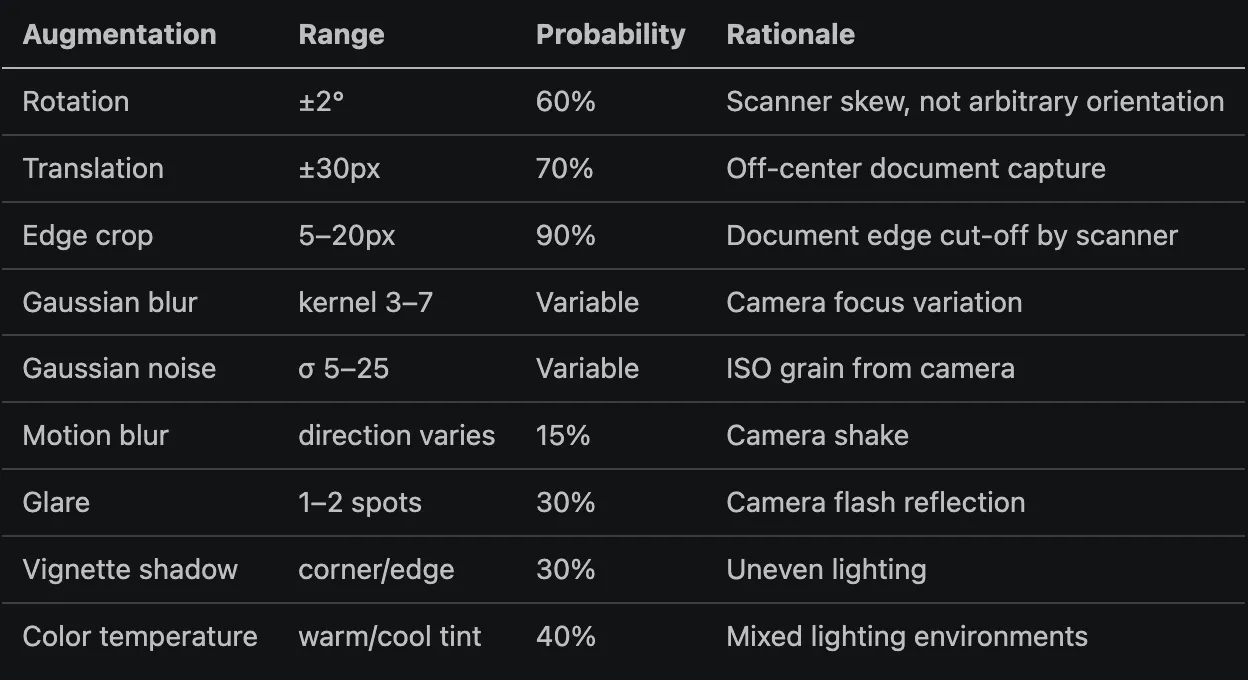
Here is the glare augmentation, which is often overlooked but matters for real document photos:
import cv2
import numpy as np

def apply_glare(image):
    h, w = image.shape[:2]
    num_spots = random.randint(1, 2)
    result = image.copy().astype(np.float32)

    for _ in range(num_spots):
        cx = random.randint(w // 4, 3 * w // 4)
        cy = random.randint(h // 4, 3 * h // 4)
        radius = random.randint(30, 80)
        alpha = random.uniform(0.15, 0.35)

        Y, X = np.ogrid[:h, :w]
        dist = np.sqrt((X - cx)**2 + (Y - cy)**2)
        # Radial gradient: 1.0 at center, 0.0 at radius
        mask = np.clip(1.0 - dist / radius, 0, 1)

        for c in range(3):
            result[:, :, c] += alpha * mask * (255 - result[:, :, c])

    return np.clip(result, 0, 255).astype(np.uint8)
The key insight: if your augmentations are too aggressive, the OCR step in production will fail to extract text — and your model never sees clean OCR output to learn from. Calibrate augmentation intensity to what your production OCR engine can handle.
Step 5: OCR Error Simulation
This is the layer most synthetic data pipelines skip — and it's why they fail in production.
Your model will receive input from a real OCR engine (Tesseract, AWS Textract, Google Document AI, etc.). These engines make systematic errors. If your training data is pixel-perfect, the model learns a distribution that doesn't match inference time.
The OCRErrorSimulator injects realistic errors at both character and word level:
class OCRErrorSimulator:
    CHAR_CONFUSIONS = {
        'O': ['0', 'Q', 'D'],
        '0': ['O', 'Q'],
        'I': ['1', 'L', '|'],
        '1': ['I', 'l', '|'],
        'S': ['5', '$'],
        '5': ['S'],
        'B': ['8', '6'],
        '8': ['B'],
        'Z': ['2'],
        '2': ['Z'],
        'G': ['6'],
        'U': ['V', 'W'],
    }

    WORD_REPLACEMENTS = {
        'STREET': ['ST', 'STR', 'ST.'],
        'AVENUE': ['AVE', 'AV'],
        'ROAD': ['RD'],
        'CLOSE': ['CL', 'CLS'],
        'FEDERAL': ['FEDL', 'FED.'],
    }

    def __init__(self, error_rate=0.05):
        self.error_rate = error_rate

    def corrupt_token(self, token):
        if random.random() > self.error_rate:
            return token  # most tokens survive unchanged

        # Character-level confusions
        chars = list(token)
        for i, ch in enumerate(chars):
            if ch.upper() in self.CHAR_CONFUSIONS and random.random() < 0.3:
                replacement = random.choice(self.CHAR_CONFUSIONS[ch.upper()])
                chars[i] = replacement if ch.isupper() else replacement.lower()
        corrupted = ''.join(chars)

        # Mutation types: swap adjacent chars, delete, double
        mutation = random.choice(['swap', 'delete', 'double', 'none'])
        if mutation == 'swap' and len(corrupted) > 2:
            i = random.randint(0, len(corrupted) - 2)
            corrupted = corrupted[:i] + corrupted[i+1] + corrupted[i] + corrupted[i+2:]
        elif mutation == 'delete' and len(corrupted) > 2:
            i = random.randint(0, len(corrupted) - 1)
            corrupted = corrupted[:i] + corrupted[i+1:]
        elif mutation == 'double':
            i = random.randint(0, len(corrupted) - 1)
            corrupted = corrupted[:i] + corrupted[i] + corrupted[i:]

        return corrupted

    def simulate(self, tokens, bboxes, ner_tags):
        corrupted_tokens = []
        for token in tokens:
            # Check word-level replacement first
            upper = token.upper()
            if upper in self.WORD_REPLACEMENTS and random.random() < self.error_rate:
                corrupted_tokens.append(random.choice(self.WORD_REPLACEMENTS[upper]))
            else:
                corrupted_tokens.append(self.corrupt_token(token))
        return corrupted_tokens, bboxes, ner_tags  # bboxes unchanged by OCR errors
Apply this after generating ground-truth annotations, before writing the training JSON.
Step 6: Coordinate Jitter
OCR bounding box detectors are not pixel-perfect. Add coordinate jitter to simulate the natural variation in how a text detector draws boxes around characters:
def apply_coordinate_jitter(bbox, image_width=1000, image_height=1000):
    """
    Simulates OCR bounding box imprecision.
    bbox: [x1, y1, x2, y2] normalized 0-1000
    """
    x1, y1, x2, y2 = bbox

    # 80% of tokens get slight positional jitter
    if random.random() < 0.80:
        x1 = max(0, x1 + random.randint(-1, 1))
        y1 = max(0, y1 + random.randint(-1, 1))
        x2 = min(1000, x2 + random.randint(-1, 1))
        y2 = min(1000, y2 + random.randint(-1, 1))

    # Random padding variation (OCR detectors are loose)
    padding = random.randint(0, 5)
    x1 = max(0, x1 - padding)
    y1 = max(0, y1 - padding)
    x2 = min(1000, x2 + padding)
    y2 = min(1000, y2 + padding)

    return [x1, y1, x2, y2]
This is small but matters. Without it, the model learns that LayoutLM input bboxes are mathematically precise — then sees noisy OCR output at inference and degrades.
Step 7: Assembling the Training JSON
Sort all tokens by their reading order (top-to-bottom, left-to-right), then assign BIO tags:
def build_layoutlm_sample(doc_id, field_tokens, static_anchors):
    """
    field_tokens: list of (token, bbox, label) from rendered fields
    static_anchors: list of (token, bbox) from pre-printed template text
    """
    all_tokens = []

    # Add static anchor tokens as 'O'
    for text, bbox in static_anchors:
        for word in text.split():
            all_tokens.append({'token': word, 'bbox': bbox, 'label': 'O'})

    # Add field tokens with BIO tagging
    for field_name, tokens_bboxes, label in field_tokens:
        for i, (token, bbox) in enumerate(tokens_bboxes):
            bio_label = f"B-{label}" if i == 0 else f"I-{label}"
            all_tokens.append({'token': token, 'bbox': bbox, 'label': bio_label})

    # Sort by reading order: top-to-bottom, left-to-right
    all_tokens.sort(key=lambda t: (t['bbox'][1], t['bbox'][0]))

    # Repair BIO tags after sorting (multi-line fields need re-evaluation)
    all_tokens = repair_bio_tags(all_tokens)

    return {
        "id": doc_id,
        "tokens": [t['token'] for t in all_tokens],
        "bboxes": [t['bbox'] for t in all_tokens],
        "ner_tags": [t['label'] for t in all_tokens]
    }


def repair_bio_tags(tokens):
    """After sorting, ensure each new entity starts with B-, not I-."""
    prev_label = 'O'
    for t in tokens:
        label = t['label']
        if label.startswith('I-'):
            entity_type = label[2:]
            # If previous was neither B- nor I- of same type, promote to B-
            if not (prev_label in (f"B-{entity_type}", f"I-{entity_type}")):
                t['label'] = f"B-{entity_type}"
        prev_label = t['label']
    return tokens
Step 8: Finetuning LayoutLMv1
With your dataset generated and serialized to JSONL, finetuning follows the standard Hugging Face token classification pattern:
from transformers import (
    LayoutLMTokenizer,
    LayoutLMForTokenClassification,
    TrainingArguments,
    Trainer,
)
from datasets import Dataset
import torch

# Load your generated dataset
import json

def load_dataset_from_jsonl(path):
    samples = []
    with open(path) as f:
        for line in f:
            samples.append(json.loads(line))
    return samples

raw_data = load_dataset_from_jsonl("output/drivers_license_5000.jsonl")

# Build label map from your document config
label_list = [
    "O",
    "B-LIC_NO", "I-LIC_NO",
    "B-NAME", "I-NAME",
    "B-DOB", "I-DOB",
    "B-ADDRESS", "I-ADDRESS",
    "B-ISS_DATE", "I-ISS_DATE",
    "B-EXP_DATE", "I-EXP_DATE",
    "B-SEX", "I-SEX",
]
label2id = {l: i for i, l in enumerate(label_list)}
id2label = {i: l for i, l in enumerate(label_list)}

tokenizer = LayoutLMTokenizer.from_pretrained("microsoft/layoutlm-base-uncased")

def tokenize_and_align(example):
    encoding = tokenizer(
        example["tokens"],
        boxes=example["bboxes"],
        word_labels=[label2id[t] for t in example["ner_tags"]],
        truncation=True,
        padding="max_length",
        max_length=512,
        is_split_into_words=True,
        return_tensors="pt",
    )
    return {k: v.squeeze(0) for k, v in encoding.items()}

dataset = Dataset.from_list(raw_data)
tokenized = dataset.map(tokenize_and_align, remove_columns=dataset.column_names)

model = LayoutLMForTokenClassification.from_pretrained(
    "microsoft/layoutlm-base-uncased",
    num_labels=len(label_list),
    id2label=id2label,
    label2id=label2id,
)

training_args = TrainingArguments(
    output_dir="./layoutlm-finetuned",
    num_train_epochs=5,
    per_device_train_batch_size=8,
    learning_rate=5e-5,
    warmup_ratio=0.1,
    weight_decay=0.01,
    save_strategy="epoch",
    evaluation_strategy="epoch",
    load_best_model_at_end=True,
    fp16=True,  # requires GPU with mixed precision support
)

trainer = Trainer(
    model=model,
    args=training_args,
    train_dataset=tokenized,
)

trainer.train()
trainer.save_model("./layoutlm-finetuned/best")
Important: LayoutLMTokenizer Behavior
The LayoutLMTokenizer will subword-tokenize your tokens (e.g., "ABCDE12345" → ['AB', '##CDE', '##12345']). Each subword inherits the same bounding box as the parent word. The word_labels argument handles this correctly — you pass word-level labels, and the tokenizer propagates them.
For multi-token values you want treated as a single unit (e.g., a license number with an embedded space), use the unit separator character (\x1f) as a space that survives tokenization:
# "02-812 KATOWICE" should be one token for labeling purposes
value = "02-812\x1fKATOWICE"
# Tokenizer sees it as one word; display: "02-812 KATOWICE"
Step 9: Scaling Up with Multiprocessing
Generating 10,000 samples serially takes time. Both generation scripts support Python's multiprocessing.Pool:
from multiprocessing import Pool, cpu_count

def generate_single_sample(args):
    sample_id, config, output_dir = args
    generator = DataGenerator()
    # ... generate and save
    return sample_id

def generate_batch(config, num_samples, output_dir):
    args = [(i, config, output_dir) for i in range(num_samples)]
    with Pool(cpu_count()) as pool:
        results = pool.map(generate_single_sample, args)
    return results
On an 8-core machine, we generate 5,000 annotated samples in under 4 minutes. For JSON-only annotation generation (no image rendering), throughput is roughly 3x higher.
What We Learned the Hard Way
- Augmentation calibrates to your OCR engine, not your aesthetic. Early versions used ±10° rotation. Our production OCR engine deskewed documents before extraction, so training the model on ±10° rotated inputs created a mismatch. Keep augmentations within the range your OCR pre-processing leaves behind.
- Static anchors are not optional. Without them, the model can only use the candidate token's own position to identify its label. With them — "the token 80px to the right of the LICENCE NO: anchor, at y=215" — identification becomes robust to font changes and template variants.
- Multi-template support is essential for production. Documents issued across different years or states use different templates. A model trained on a single template learns template-specific position priors, not general field understanding. Distribute training samples evenly across all template variants.
- BIO tag repair is non-negotiable. When you sort tokens by reading order after generating them field-by-field, multi-line fields (particularly addresses) can get their B- tag in the middle of the field. The repair pass is essential to prevent the model from learning broken label sequences.
- Validate with debug visualization before training. Both scripts support overlaying bounding boxes onto template images. Run this before any training run. A single misconfigured field coordinate will silently poison thousands of samples.
python generate_layoutlm.py drivers_license --debug-viz --num-samples 5
# Opens/saves images with bbox overlays for inspection
Results and Next Steps
After finetuning on 8,000 synthetic samples (5,000 driver's licenses, 3,000 voter cards) with 80/20 train/eval split:
- Token-level F1 for key fields: NAME 0.91, LIC_NO 0.97, DOB 0.89
- Near-zero performance on fields with high OCR error rates (FACIAL_MARKS at 0.64) — indicating those errors need more targeted simulation
The weak spots pointed directly at what to improve in the synthetic pipeline, not what to improve in the model. That's the right kind of feedback loop.
Where to go from here:
- Add LayoutLMv2/v3 support (visual features require actual images, not just JSON annotations)
- Expand to passport, national ID, and voter card document types via the JSON config system
- Incorporate real OCR engine error patterns (run your OCR on synthetic images, compare to ground truth, adjust OCRErrorSimulator accordingly)
- Use model confidence scores on held-out synthetic samples to identify which error types the model struggles with, then increase their simulation frequency
The Full Pipeline at a Glance
1. Design document template config (JSON)
        ↓
2. Generate synthetic field values (DataGenerator)
        ↓
3. Render onto blank template image (PIL/OpenCV)
        ↓
4. Calculate per-token bounding boxes (PIL font metrics)
        ↓
5. Apply restrained augmentations (rotation, blur, glare...)
        ↓
6. Update bounding boxes to match augmented image
        ↓
7. Simulate OCR errors (OCRErrorSimulator)
        ↓
8. Apply coordinate jitter
        ↓
9. Sort tokens by reading order, assign BIO tags, repair
        ↓
10. Serialize to JSONL → finetune LayoutLMv1
The full implementation is open source at github.com/urtentic/layoutlm-synthetic-data. The JSON configuration system means adding a new document type — national ID, residence permit, professional license — requires zero code changes, only a new config block.
Resources
- urtentic/layoutlm-synthetic-data — the open-source pipeline described in this article
- LayoutLM: Pre-training of Text and Layout for Document Image Understanding — Xu et al., 2020
- microsoft/layoutlm-base-uncased on Hugging Face
- Hugging Face LayoutLM fine-tuning guide
- FUNSD dataset — useful as a benchmark to calibrate your data format
- Faker documentation — for understanding locale-specific data generation